One of the first things I do before revising is a bit dastardly: Map the book on a spreadsheet.

If you’re a plotter, you may laugh at the necessity of doing this in reverse. But pantsers curl into fetal position at the mere thought of mapping our scenes out in any kind of organized fashion. However, fear not. You can do this exercise in an hour … or if you’re like me, over the course of several inebriated days. Once you’re done, you’ll have a quick overview of the state of your novel. From there, it’s a little bit easier to get a handle on where you’re going.
Now, what I call a “scene map” (and I don’t know if I’m using this term right) is simply a spreadsheet. True story: You can use Scrivener’s outliner to do a lot of this work for you. I like Google docs because I get revision history and more powerful tools, such as automatic calculations or merging cells. You can find a very basic spreadsheet here. (Feel free to make a copy of this to your own Google drive.)
![]()
The basic spreadsheet contains:
- Act 1-3 and a word count generated off the chapter word count field.
- Chapter # and word count
- Scene # and word count
- Location of scene
- Optional POV of scene
- Characters in the scene
- The plot – what happens?
- The purpose – why does this scene exist?
Once you’ve got your novel laid out how it exists currently, you can use this however you like. Add in more columns or change them to match your MS. My own spreadsheets are wildly different for every MS because my needs are different (twss).
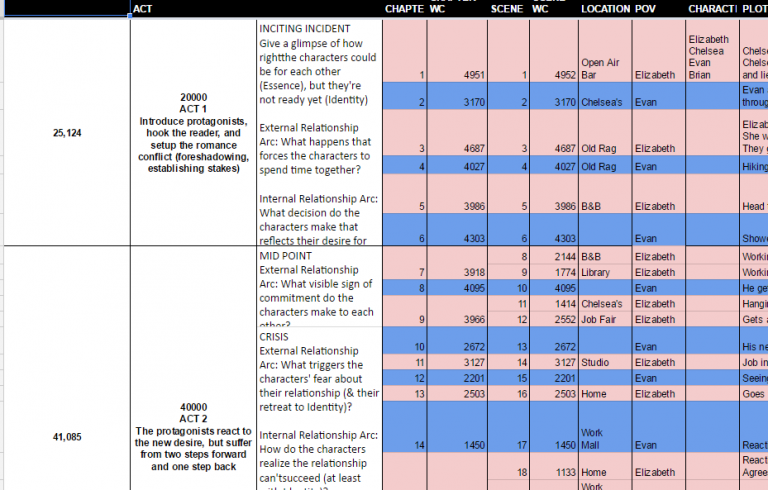
Here’s a glimpse of how I used my spreadsheet on a recent Contempory Romance novel to incorporate Jami Gold’s romance beat sheet:
Go crazy with it, and make it fit your own needs.
For one of my books, every chapter is a day, and every act is a week. So my scene map looks like this:

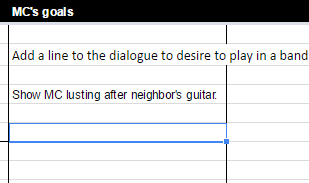
Once I have the current state set up, what I like to do is create a column to the right for every action item in my edit letter. “Make MC’s goals clearer” might be a column header. I can look down through my list of scenes and identify places where it might make sense to do this. Then I can add a comment to the cell next to that scene to explain my plans to achieve that goal. For example it might look like this:
I also like to use color coding as I go. I might insert a new row for a scene I want to add and color that row BLUE. Then I might change it to GREEN when I’ve finished. Or RED if I plan to delete the scene. Or whatever. There’s no right or wrong way to do this, and again, plotters are laughing at those of us who don’t come by this naturally.
(Oh and dirty little secret, you can actually do this WHILE you’re drafting or even BEFORE. I KNOW!)
So if you want to give this a go, copy the blank spreadsheet and start plugging in the details. You’ll probably want to take a shot of tequila and pound a wall between chapters. This is normal. Go ahead and take breaks to get drunk and hit things.

But then when you’re done, you can tweet me a virtual high five! Because you’ve defeated the beast!
This is awesome! Thanks for sharing – I definitely want to try this.
Armed with this knowledge, the world will be mine!